

How to install a solar roof vent?
Before we know how to install a solar roof vent, I would want to tell you the benefits of having a solar roof ventilation fan installed at your home or workplace.
Solar Roof Ventilation Fan
Solar Roof Ventilation Fans are a great alternative to fight back extreme weather conditions. Solar roof ventilation fan simply extracts hot and dry air from the roof and keeps your house cool. Summers in any country across the world becomes unbearable, especially when the temperature continues to rise. And the truth is not everybody can afford huge electricity bills. However, a great solution to tackle this is Solar Roof Ventilation Fan. The SolarKing Solar Roof ventilation fan replaces the hot air in your roof space in summer with the cooler outside air, which makes it easy and comfortable indoors even when outside weather in summers is extreme. Multiple SolarKing solar roof ventilation fans can be used on larger or double-storey homes or buildings.
Installation of SolarKing Solar Roof Vent, Easy Install and Superior Performance
The SolarKing Roof Ventilation Fan is easy to install. One can install it all by themselves. Also, the SolarKing 320MM Solar Roof Vent can easily be mounted either on a tiled roof or ridged metal roofs. Also, the unit has an adjustable tilt solar panel for use on non-north facing roofs or flat roofs. Besides, for installing solar roof ventilation fan on the tiled roof, only 1 roof tiles are required to be removed. While, for metal roofs just a 300mm opening will be required to fit the solar roof ventilation fan.
Moreover, it is recommended to have the brushless DC motor, it makes the operation quiet and assures the motor will have a long life. Also, brushless motors are far more efficient compared to other motors.
Here is how to install Solar Roof Vent on a Metal / Colorbond roof……
Here are step by step instructions and the list of tools that will be required to install a solar roof ventilation fan.
Believe you me, installing solar roof fans is easy even if you are doing it for the first time. A solar roof fan can be installed in just 10 easy steps. Doing it for the first time may take a longer than expected, but gradually the process starts to look easier. Here are the steps:
1. First things first, take your ladder and reach into your roof and choose the right location. Mark the location where you want to have your fan installed, mark between two rafters. Make sure you choose a location that allows for balanced airflow throughout the roof. Always install the vent next to ridge capping to avoid any leaks.
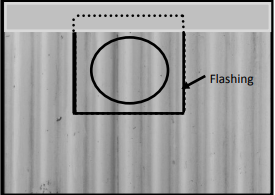
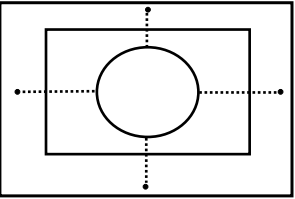
2. Slide the top edge of the flashing up under the ridge capping of the roof (remove 2 ridge capping screws to do this) as per Figure 2. It is important to position the flashing is not covering any roofing screws, the roofing screws running from the top to the bottom of the roof are where the rafters are located. Once positioned mark a circle on the inside edge of the flashing.
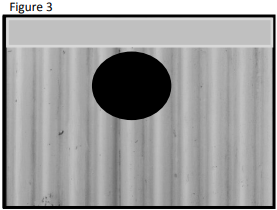
3. Following the circle marked on the roof cut the roof as per figure 3 using a metal bladed saw or tin snips. If there is any foil under the metal sheets cut a cross in the foil and fold back the corners. Tip: Take care not to cut into any battens/rafters under the roof sheet when cutting.
4. Slide the flashing back up under the roof capping and refit the 2 ridge capping screws through the flashing and bend the edges of the flashing down on the left and right sides of the flashing to create a tight fit with the roof. Then using tin snips to cut notches in the bottom of the flashing to suit the corrugations of the roof and bend the notches down. Then silicon the underside of the edges and the outside of the edges and the underside and outside of the bottom section of the flashing. Note: Don’t silicon the valleys on the bottom of the flashing.
5. As per figure 4 use up a minimum of 8 (but up to 12) tech or roof screws with rubber seals along the left, right and bottom of the flashing to secure to the roof. Note: Tech screws and roofing screws are not included
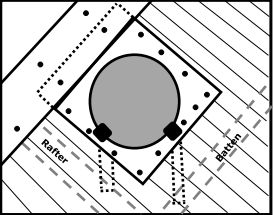
6. As per figure 4 fit a minimum of 1 rafter/batten strap (2 supplied). The strap folds over the circular ridge on the flashing and can either be screwed or nailed through the strap.
7. Place the main body of the fan over the flashing as per figure 5. Turn the main body of the fan left or right to suit the direction required for the solar panel (Tip: Aim between North and West to best suit the sun in warmer months)
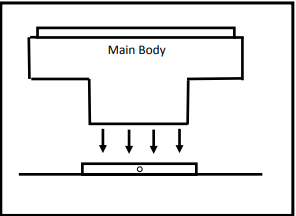

8. As per figure 6 using a powered screw driver, screw at least 4 small tech screws through the pre-drilled holes in the fan main body through into the flashing. (Tip: You may not be able to get the top tech screw in place as the angle of the roof may prevent this, in this case you can simply screw the tech screw into another section where the main body is over the flashing)
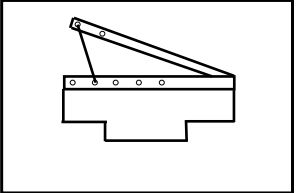
9. As per figure 7 you can now adjust the angle of the solar panel to receive maximum sun during the mid afternoon in the warmer months. As the pitch of many roofs in parts of Australia are already at a good angle for the summer time sun you may just be able to leave the panel in the down position as it is supplied from the factory, no need to do anything. To adjust the angle of the solar panels up just adjust the 2 arms to the correct angle and tighten the screws.
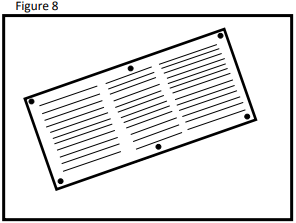
10. Fitting under the eave vents as per figure 8 to the side of the house that is cool in the afternoon will allow the cooler outside air to be drawn into the roof space. These are especially required when the roof has foil under the tiles, but regardless eave vents will improve airflow.
Parts Included in Solarking Roof Ventilation Kit: 1x Solar Fan, 1x Flexible Flashing, 5x Tech Screws, 2x Rafter/batten Straps